Developer Guide
- Acknowledgements
- Setting up, getting started
- Design
- Implementation
- Documentation, logging, testing, configuration, dev-ops
- Appendix: Requirements
- Appendix: Instructions for manual testing
Acknowledgements
Setting up, getting started
Refer to the guide Setting up and getting started.
Design
Architecture
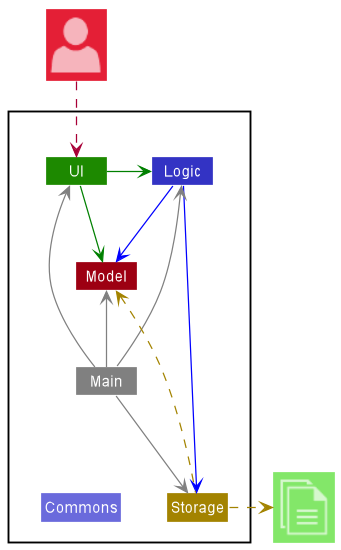
The Architecture Diagram given above explains the high-level design of the App.
Given below is a quick overview of main components and how they interact with each other.
Main components of the architecture
Main has two classes called Main and MainApp. It is responsible for,
- At app launch: Initializes the components in the correct sequence, and connects them up with each other.
- At shut down: Shuts down the components and invokes cleanup methods where necessary.
Commons represents a collection of classes used by multiple other components.
The rest of the App consists of four components.
-
UI: The UI of the App. -
Logic: The command executor. -
Model: Holds the data of the App in memory. -
Storage: Reads data from, and writes data to, the hard disk.
How the architecture components interact with each other
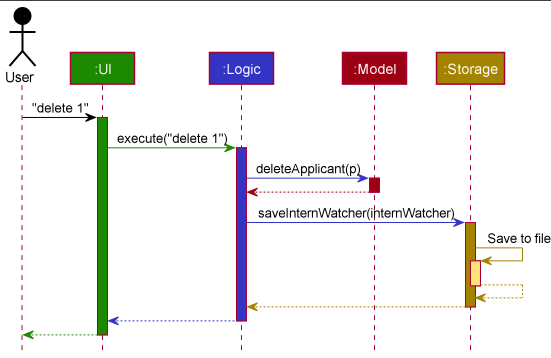
The Sequence Diagram below shows how the components interact with each other for the scenario where the user issues the command delete 1.
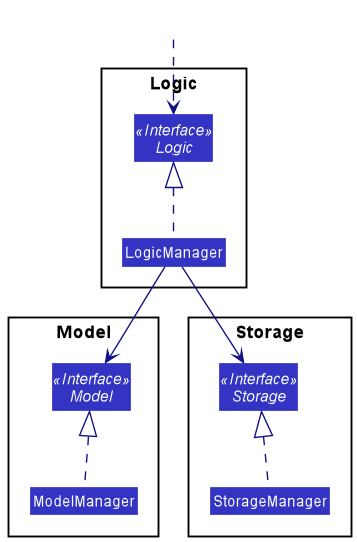
Each of the four main components (also shown in the diagram above),
- defines its API in an
interfacewith the same name as the Component. - implements its functionality using a concrete
{Component Name}Managerclass (which follows the corresponding APIinterfacementioned in the previous point.
For example, the Logic component defines its API in the Logic.java interface and implements its functionality using the LogicManager.java class which follows the Logic interface. Other components interact with a given component through its interface rather than the concrete class (reason: to prevent outside component’s being coupled to the implementation of a component), as illustrated in the (partial) class diagram below.
The sections below give more details of each component.
UI component
The API of this component is specified in Ui.java
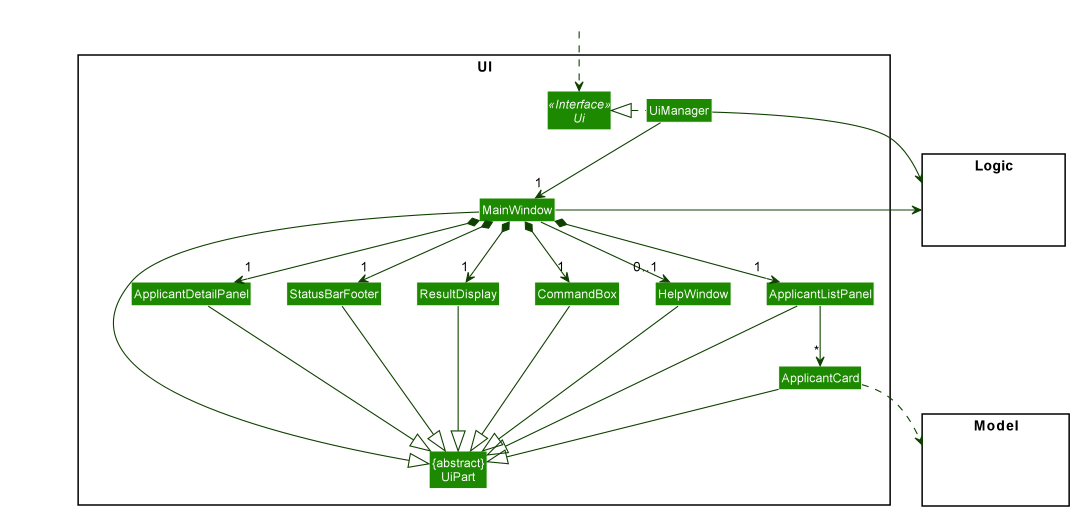
The UI consists of a MainWindow that is made up of parts e.g.CommandBox, ResultDisplay, ApplicantListPanel, StatusBarFooter etc. All these, including the MainWindow, inherit from the abstract UiPart class which captures the commonalities between classes that represent parts of the visible GUI.
The UI component uses the JavaFx UI framework. The layout of these UI parts are defined in matching .fxml files that are in the src/main/resources/view folder. For example, the layout of the MainWindow is specified in MainWindow.fxml.
The UI component,
- executes user commands using the
Logiccomponent. - listens for changes to
Modeldata so that the UI can be updated with the modified data. - keeps a reference to the
Logiccomponent, because theUIrelies on theLogicto execute commands. - depends on some classes in the
Modelcomponent, as it displaysApplicantobject residing in theModel.
Logic component
API : Logic.java
Here’s a (partial) class diagram of the Logic component:
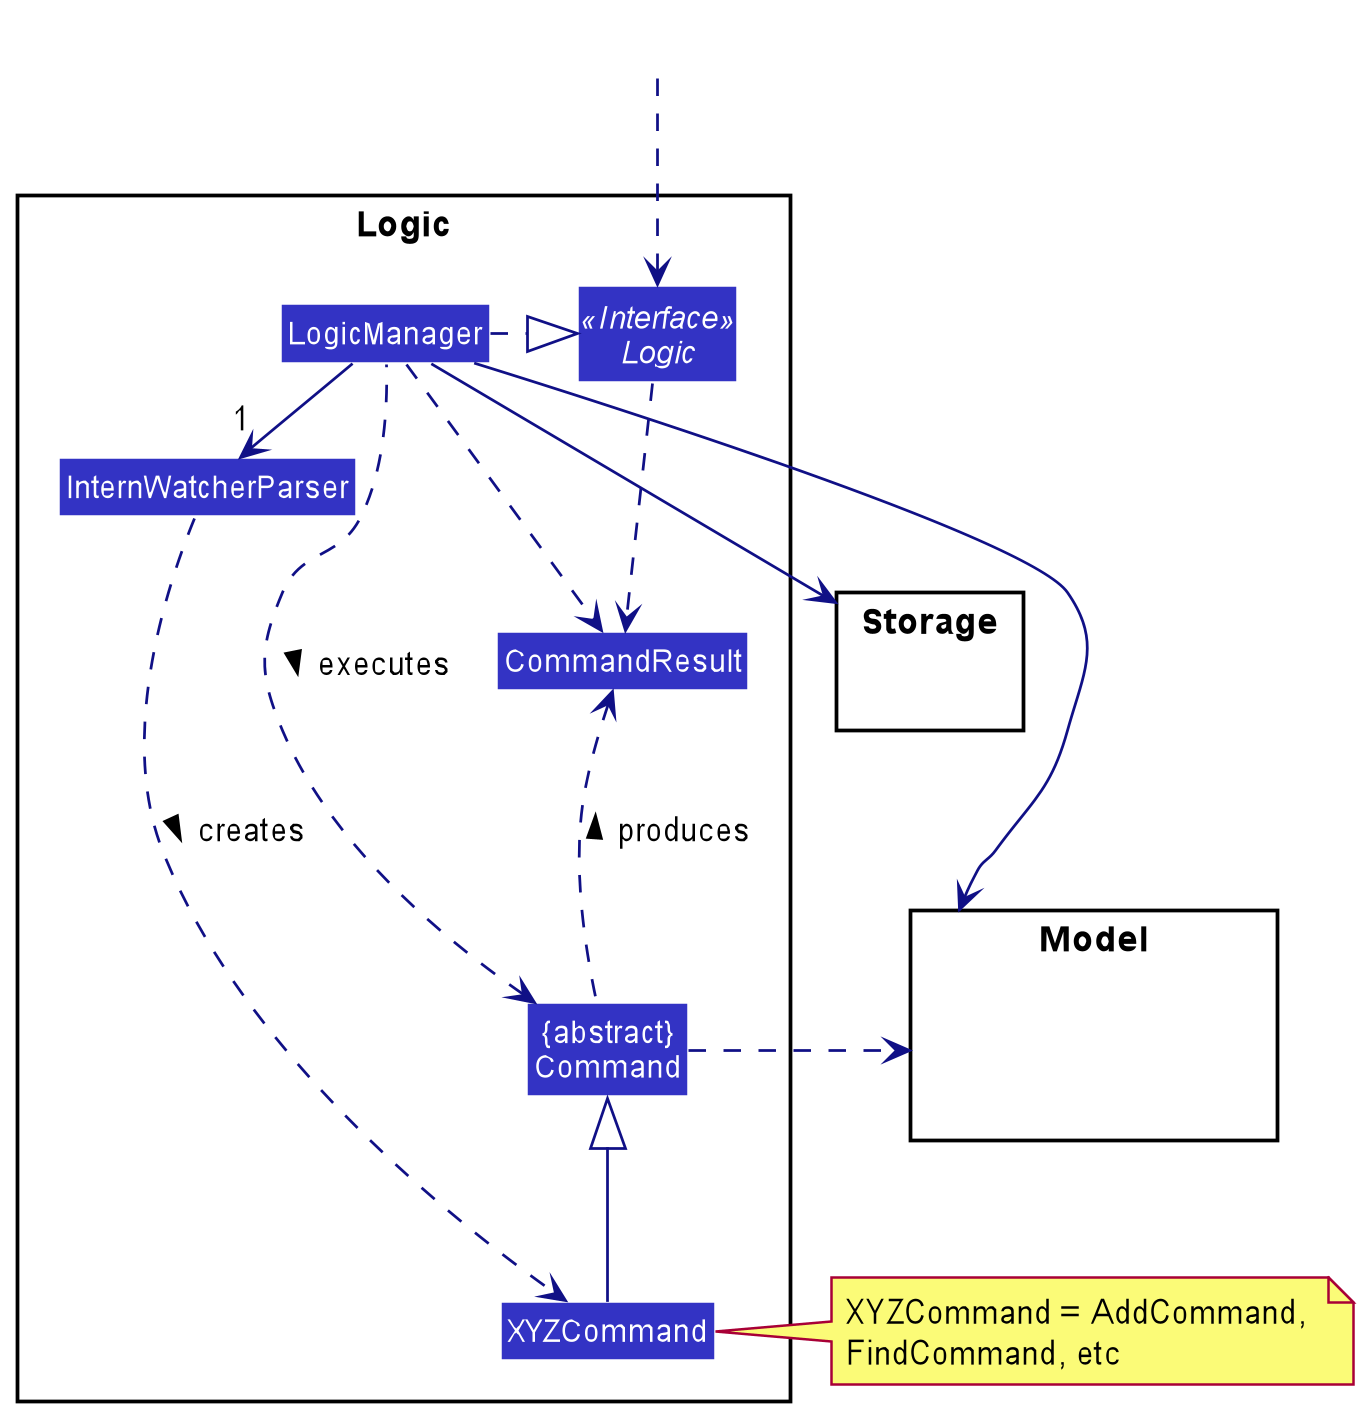
How the Logic component works:
- When
Logicis called upon to execute a command, it uses theInternWatcherParserclass to parse the user command. - This results in a
Commandobject (more precisely, an object of one of its subclasses e.g.,AddCommand) which is executed by theLogicManager. - The command can communicate with the
Modelwhen it is executed (e.g. to add an applicant). - The result of the command execution is encapsulated as a
CommandResultobject which is returned fromLogic.
The Sequence Diagram below illustrates the interactions within the Logic component for the execute("delete 1") API call.
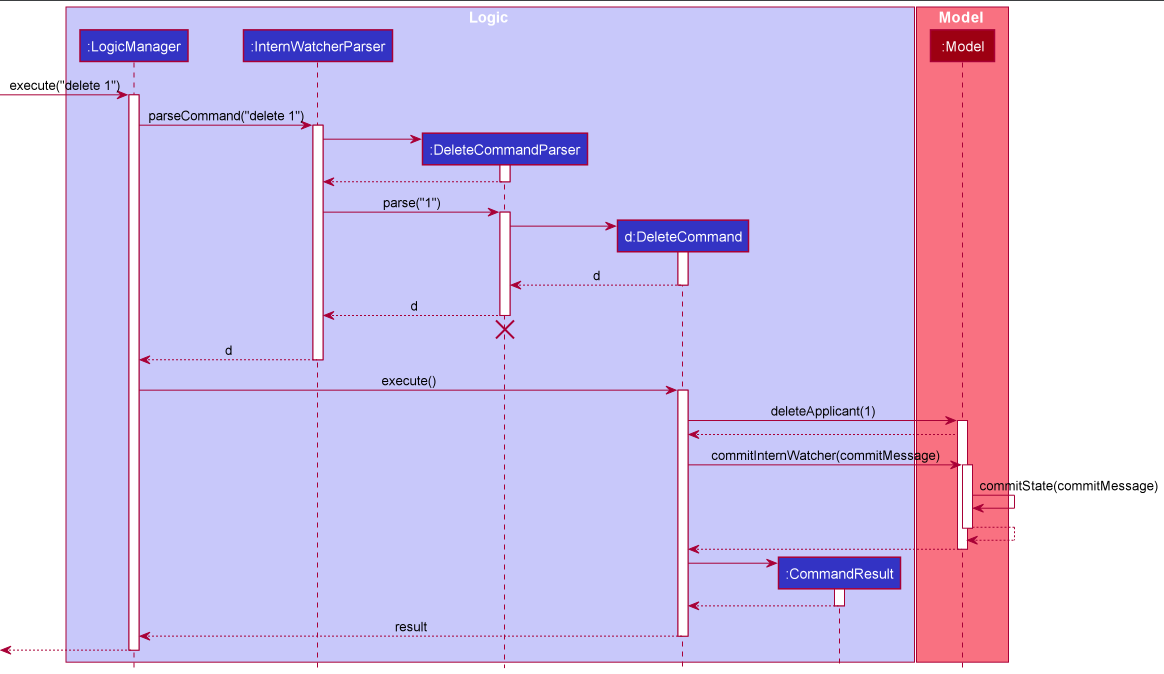
DeleteCommandParser should end at the destroy marker (X) but due to a limitation of PlantUML, the lifeline reaches the end of diagram.
Here are the other classes in Logic (omitted from the class diagram above) that are used for parsing a user command:
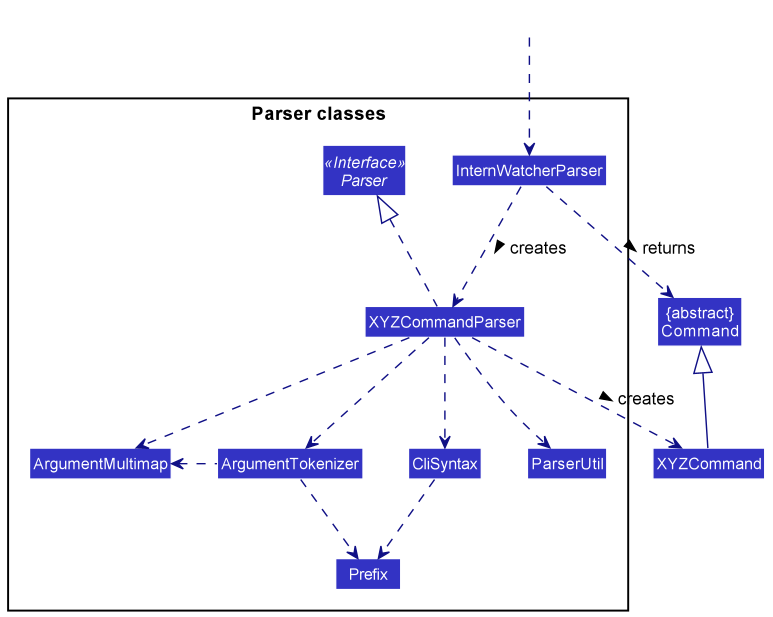
How the parsing works:
- When called upon to parse a user command, the
InternWatcherParserclass creates anXYZCommandParser(XYZis a placeholder for the specific command name e.g.,AddCommandParser) which uses the other classes shown above to parse the user command and create aXYZCommandobject (e.g.,AddCommand) which theInternWatcherParserreturns aCommandobject. - All
XYZCommandParserclasses (e.g.,AddCommandParser,DeleteCommandParser, …) inherit from theParserinterface so that they can be treated similarly where possible e.g, during testing.
Model component
API : Model.java
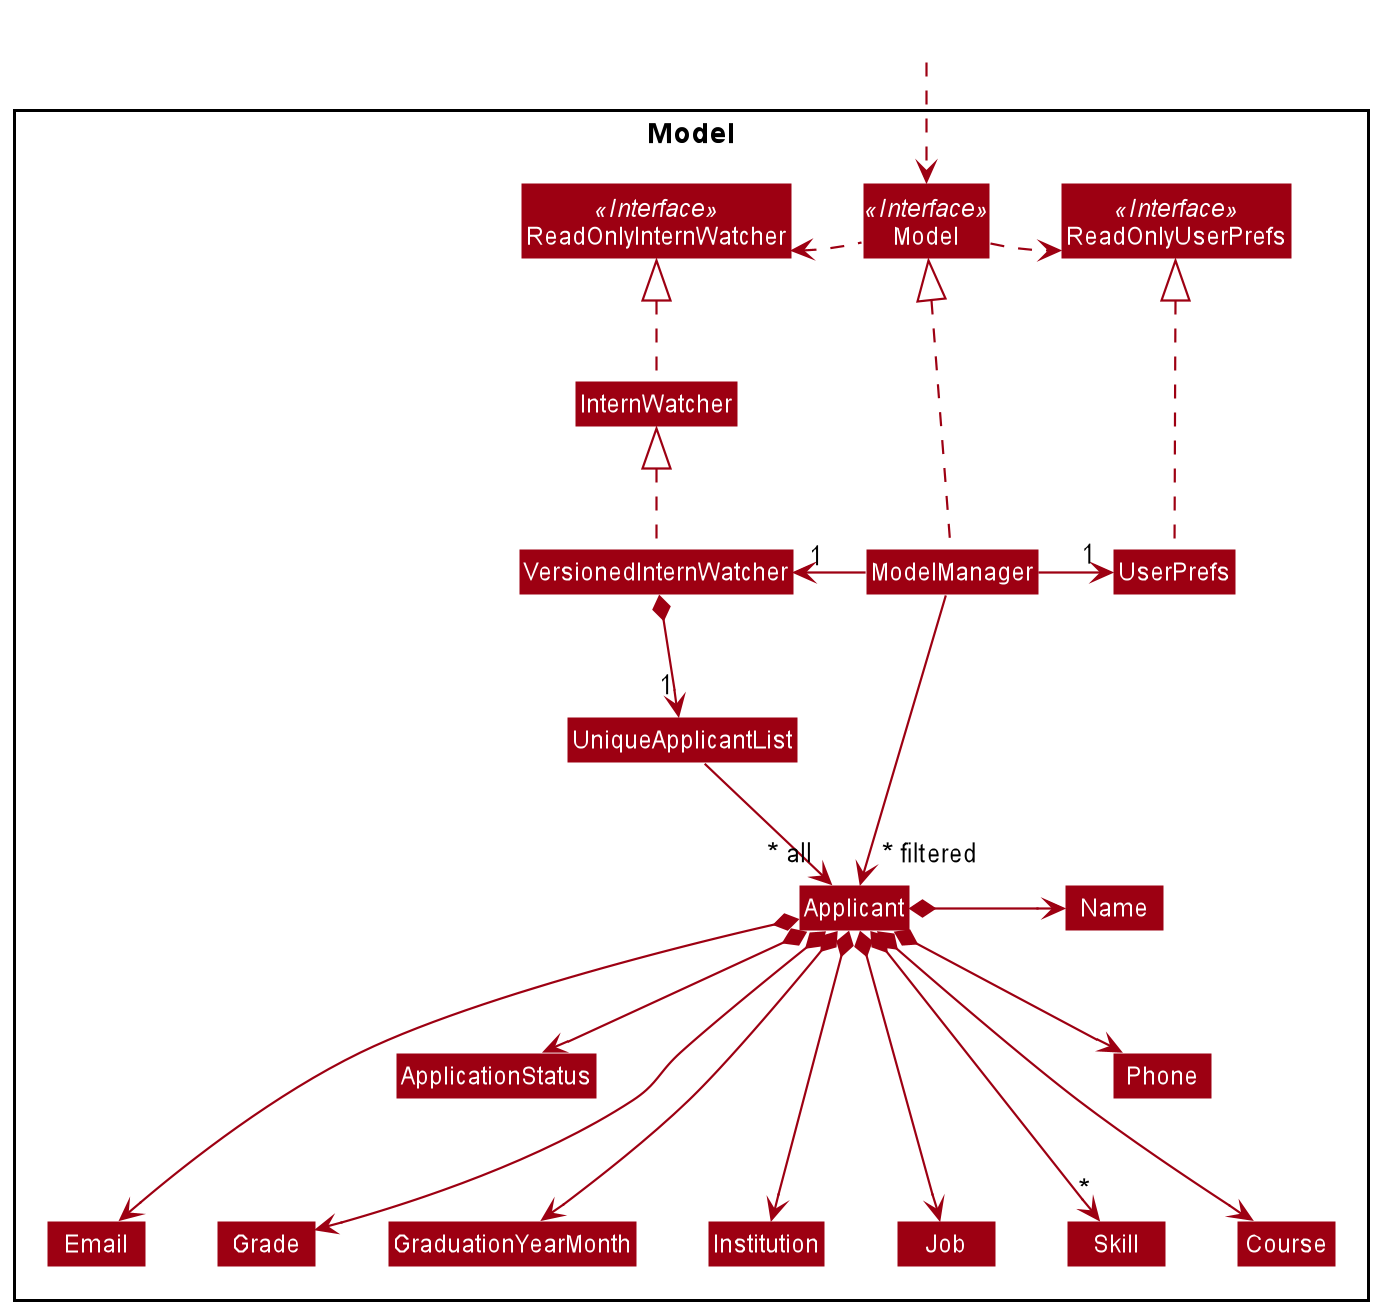
The Model component,
- stores the Intern Watcher data i.e., all
Applicantobjects (which are contained in aUniqueApplicantListobject). - stores the currently ‘selected’
Applicantobjects (e.g., results of a search query) as a separate filtered list which is exposed to outsiders as an unmodifiableObservableList<Applicant>that can be ‘observed’ e.g. the UI can be bound to this list so that the UI automatically updates when the data in the list change. - stores a
UserPrefobject that represents the user’s preferences. This is exposed to the outside as aReadOnlyUserPrefobjects. - does not depend on any of the other three components (as the
Modelrepresents data entities of the domain, they should make sense on their own without depending on other components)
Skill list in the InternWatcher, which Applicant references. This allows InternWatcher to only require one Skill object per unique skill, instead of each Applicant needing their own Skill objects.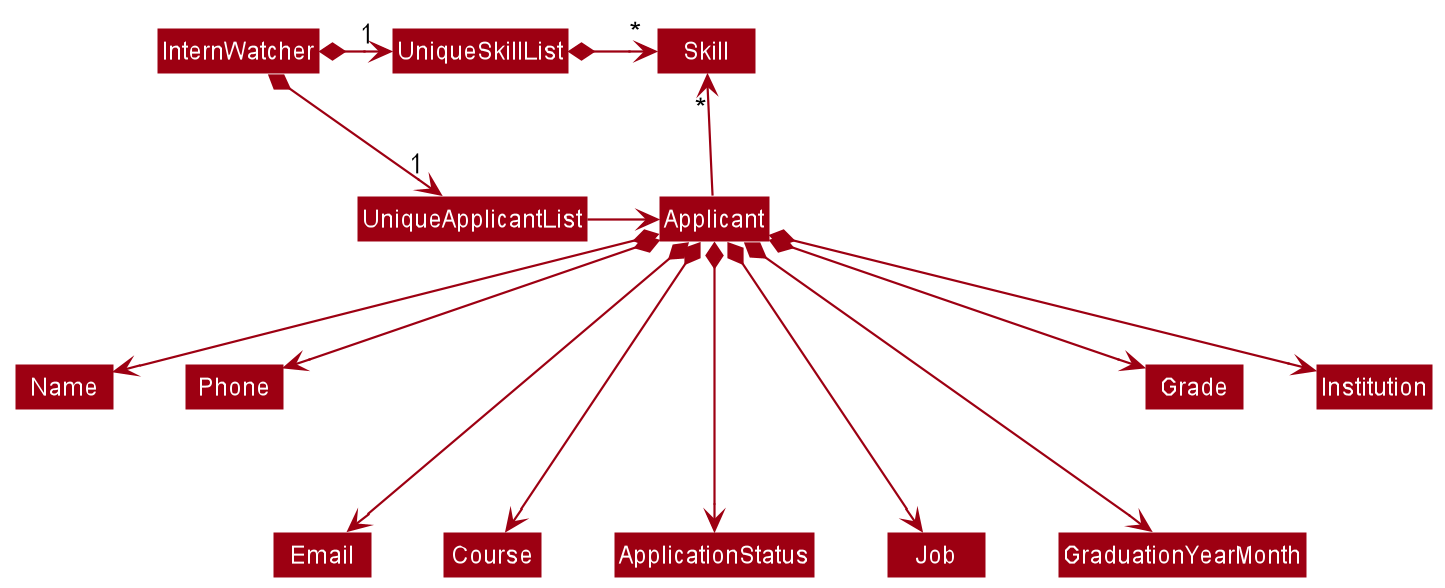
Storage component
API : Storage.java

The Storage component,
- can save both Intern Watcher data and user preference data in json format, and read them back into corresponding objects.
- inherits from both
InternWatcherStorageandUserPrefStorage, which means it can be treated as either one (if only the functionality of only one is needed). - depends on some classes in the
Modelcomponent (because theStoragecomponent’s job is to save/retrieve objects that belong to theModel)
Common classes
Classes used by multiple components are in the seedu.intern.commons package.
Implementation
This section describes some noteworthy details and design considerations on how certain features are implemented.
Add feature
Design considerations:
Aspect: Prevent duplicate entries
-
Alternative 1 (current choice): Disallow entries with duplicate names in a case-insensitive manner.
- Pros: Easy to implement
- Cons: Disallow different people of same name to be added to the app at the same time.
-
Alternative 2: Create and use another unique field for the applicants and use that for identification.
- Pros: Allow for multiple entries with the same name.
- Cons: Harder to implement. Users may abuse the
addcommand intentionally and unintentionally.
Therefore, with the above consideration and the fact that different applicants sharing same name is relatively rare case, we decided to proceed with alternative 1.
Aspect: Restriction over graduation year month
As internship has timeliness as its nature and our application development only started in 2021, it would be more reasonable for us to set January 2020 to be the lower bound of accepted graduation year month to give HRs some allowance to keep some previous data. However, anyone who graduated before such said time will not likely be looking for an internship anymore, and therefore should be disallowed in our system.
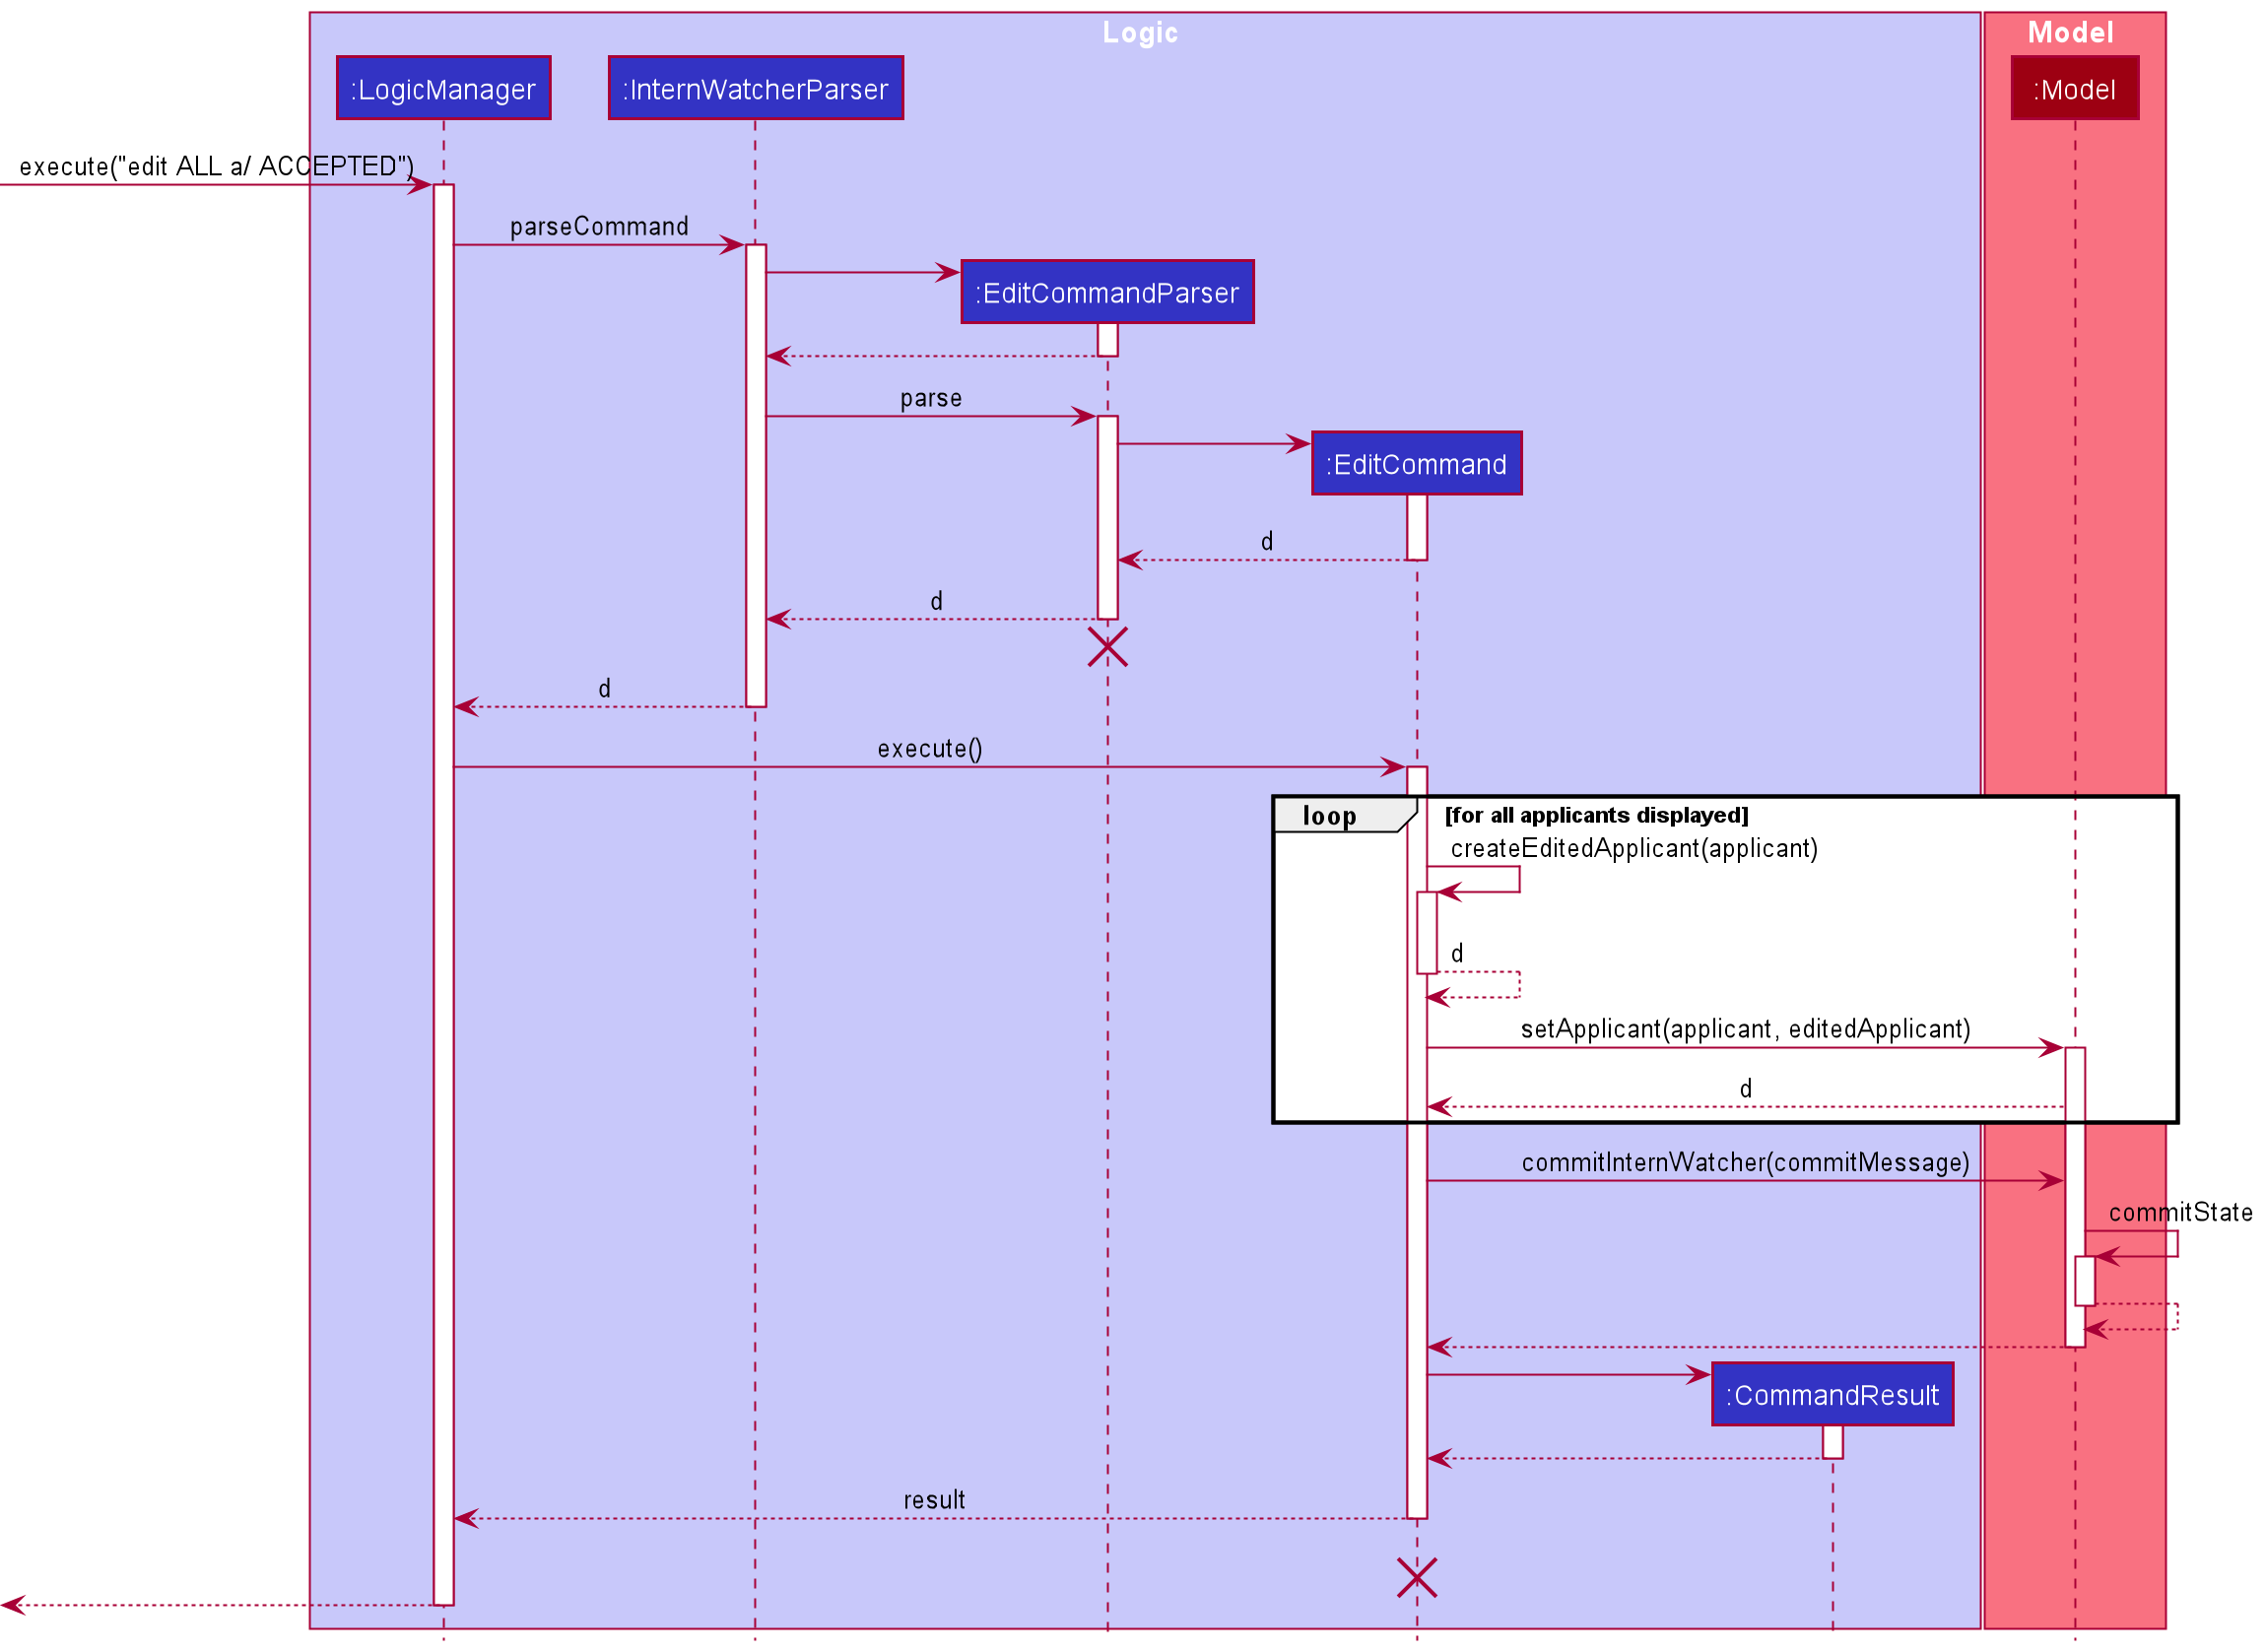
Edit ALL feature
Implementation
- The edit ALL mechanism is facilitated by the new
Selectionclass. A new parserParserUtil#parseSelectionhas been added to parseSelectionvalues, which accepts either integers or theALLstring. TheSelectionclass supports operationsSelection#hasAllSelectFlagandSelection#hasIndex, which is used byEditCommand#execute.
-
EditCommand#executehas been modified, such that wheneverSelection#hasAllSelectFlagreturnstrue,EditCommand#executeedits all applicants with the fields specified.
-
Selectionhas been given a private constructor with static factory methodsSelection#fromIndexandSelection#fromAllFlagto ensureSelectionshould not contain both index and all flag.
The following activity diagrams summarizes what happens when a user enters an edit command.
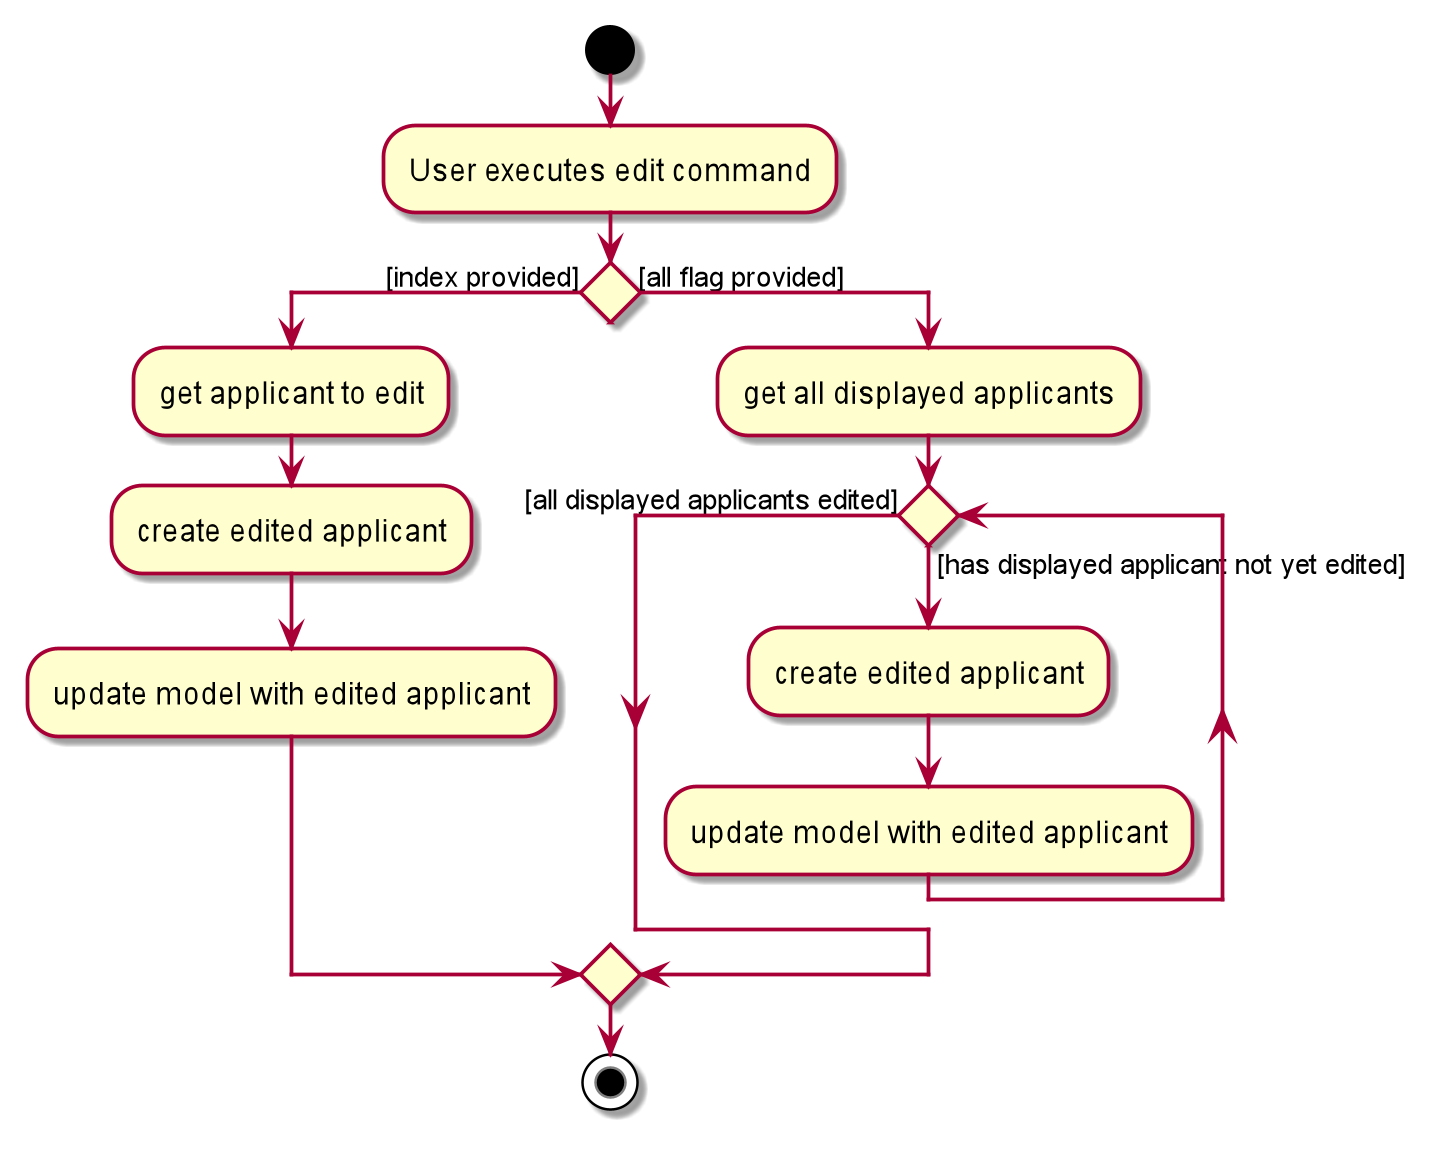
Edit ALL updates the details of all currently displayed applicants by obtaining the list of currently displayed applicants via Model#getFilteredApplicantList.
The list is then copied, after which each individual applicant is modified via Model#setApplicant in a for loop.
The following sequence diagram summarizes what happens when a user enters an editALL command.
Design considerations:
Aspect: How edit ALL is parsed
-
Alternative 1 (current choice): Modify the parser to parse the
Selection, accepting a special flag to indicate all applicants should be edited.- Pros: Easy to implement
- Cons:
EditCommandand its related parsers may become harder to test since its behaviour is now different depending on the user input.
-
Alternative 2: Create a separate
EditAllCommandwith its own parser.- Pros: Easier to test, the behaviour of
EditAllCommandshould not affectEditCommand. - Cons: Harder to implement. Users might also find editing multiple applicants having a separate command unintuitive.
- Pros: Easier to test, the behaviour of
Aspect: How edit arguments are stored
-
Alternative 1 (current choice): Create a
Selectionclass with private constructor and static factory methods to store either theALLflag or theIndex.- Pros: Disallows
ALLflag to exist together withIndex, making debugging easier. Keeps modifications to existing classes minimal. - Cons: Most
EditCommandtests would have to be changed to accommodate the new constructor.Selection
- Pros: Disallows
-
Alternative 2: Overload
EditCommandconstructor to accept an additional boolean flag.- Pros: Easy to implement, existing classes/methods need not be changed.
- Cons: Additional parser method must be created. Users may unintentionally pass both
ALLandIndexto parser.
Aspect: What fields can edit ALL accept
-
Alternative 1 (current choice): Only allow mass modifications to
ApplicationStatus.- Pros: Users cannot unintentionally modify all applicants’ personal details, such as
Name,Email,Grade. There should not be a reason to mass modify these fields. If a user created a number of applicants with the wrong detailsUndoCommandcan be used instead. - Cons: Usage of
edit ALLwould be limited.
- Pros: Users cannot unintentionally modify all applicants’ personal details, such as
-
Alternative 2: Allow mass modifications of all fields
- Pros:
edit ALLbehaviour can be kept similar toedit INDEX, increasing usability. - Cons: Allows users to unintentionally modify applicant fields that should normally not require mass edits.
- Pros:
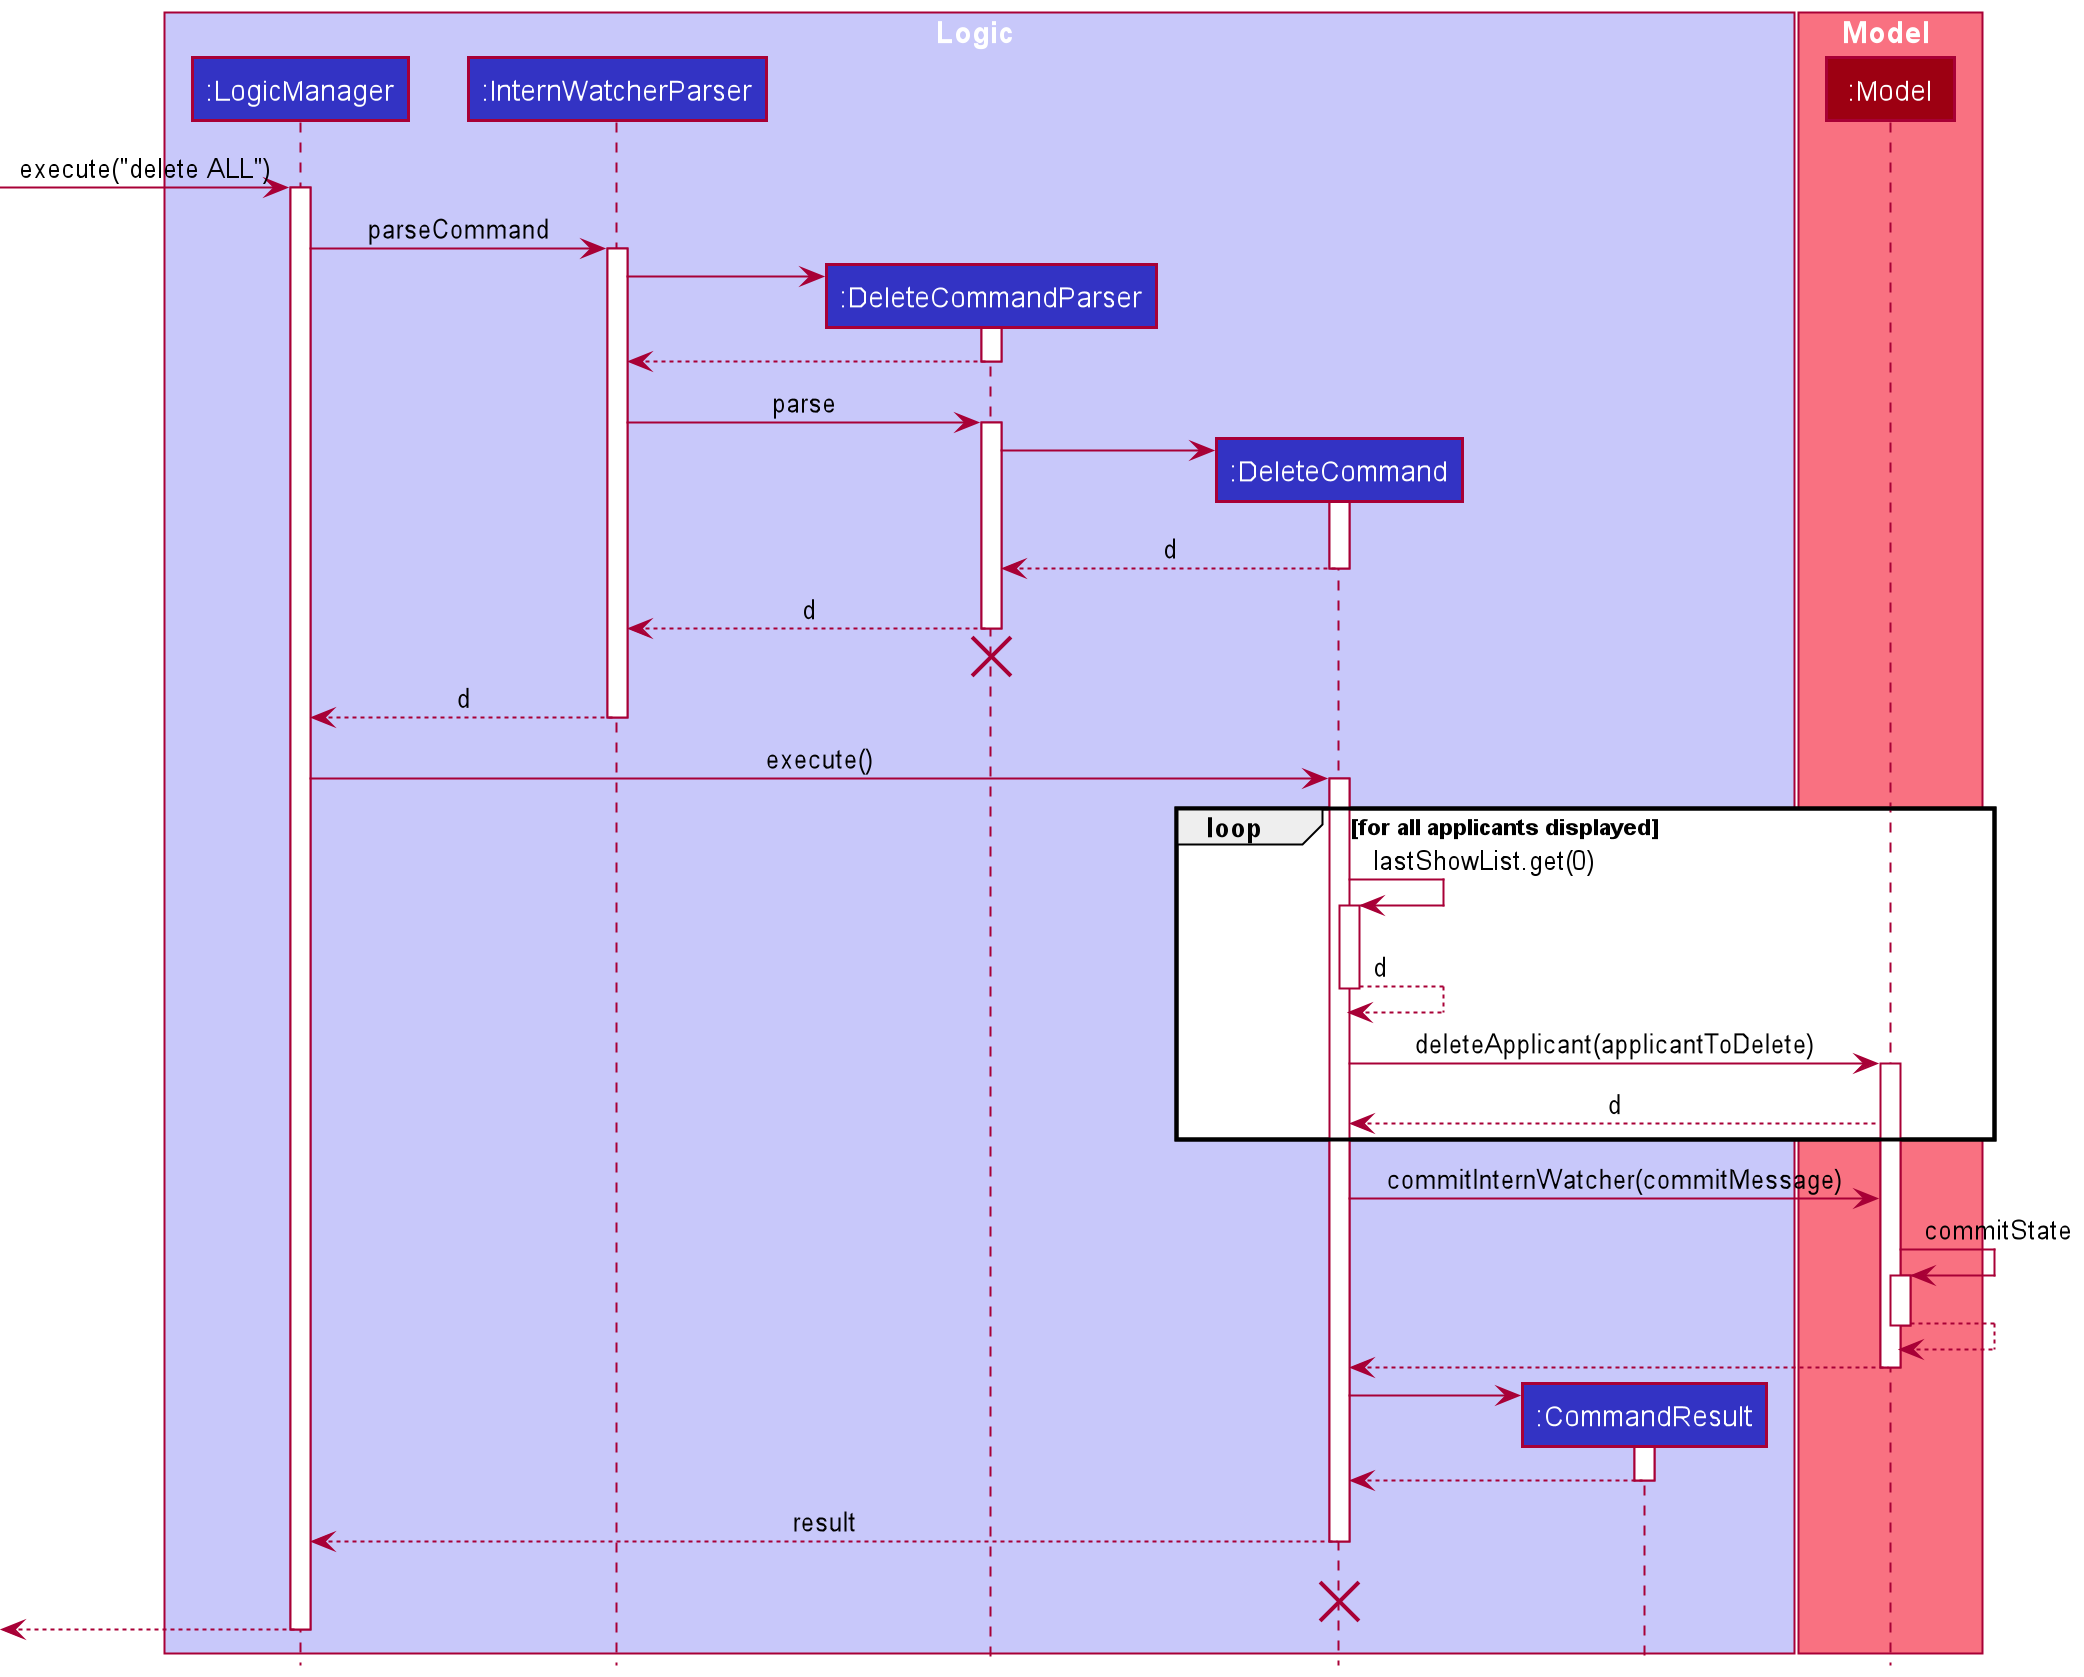
Delete ALL feature
Implementation
- The delete ALL mechanism is facilitated by the new
Selectionclass shared with edit ALL. A new parserParserUtil#parseSelectionhas been added to parseSelectionvalues, which accepts either integers or theALLstring. TheSelectionclass supports operationsSelection#hasAllSelectFlagandSelection#hasIndex, which is used byDeleteCommand#execute.
-
DeleteCommand#executehas been modified, such that wheneverSelection#hasAllSelectFlagreturnstrue,DeleteCommand#executedelete all applicants on the displayed list.
-
Selectionhas been given a private constructor with static factory methodsSelection#fromIndexandSelection#fromAllFlagto ensureSelectionshould not contain both index and all flag.
Design considerations:
Aspect: How delete ALL is parsed
-
Alternative 1 (current choice): Modify the parser to parse the
Selection, accepting a special flag to indicate all applicants should be deleted.- Pros: Easy to implement, shares the same model with
edit ALL. - Cons:
DeleteCommandand its related parsers may become harder to test since its behaviour is now different depending on the user input.
- Pros: Easy to implement, shares the same model with
-
Alternative 2: Create a special
Indexof -1 when ALL tag is attached, as such, only when the index is -1, will we execute ‘delete All’- Pros: Easy to implement
- Cons: Bypasses the intention of the Index Class. Having a negative
Indexmight throw unexpected errors.
The following sequence diagram summarizes what happens when a user enters an delete ALL command.
Filter feature
Implementation
- The filter mechanism is facilitated by
FilterCommandParser.FilterCommandParserproduces aFilterApplicantDescriptor, which in turn helps to create aFilterCommand.
-
OptionalandSetdata structures have been used to contain optional set of filters for different fields withinFilterApplicantDescriptor.
- The
FilterCommandwill make use of theFilterApplicantDescriptorto create aCombineFiltersPredicatethat will be supplied toModelManager#updateFilteredApplicantList(Predicate<Applicant>)in itsexecutemethod.
-
ModelManagerhelps filter through the applicant list with specified filter criteria contained and interpreted by theCombineFiltersPredicate#test().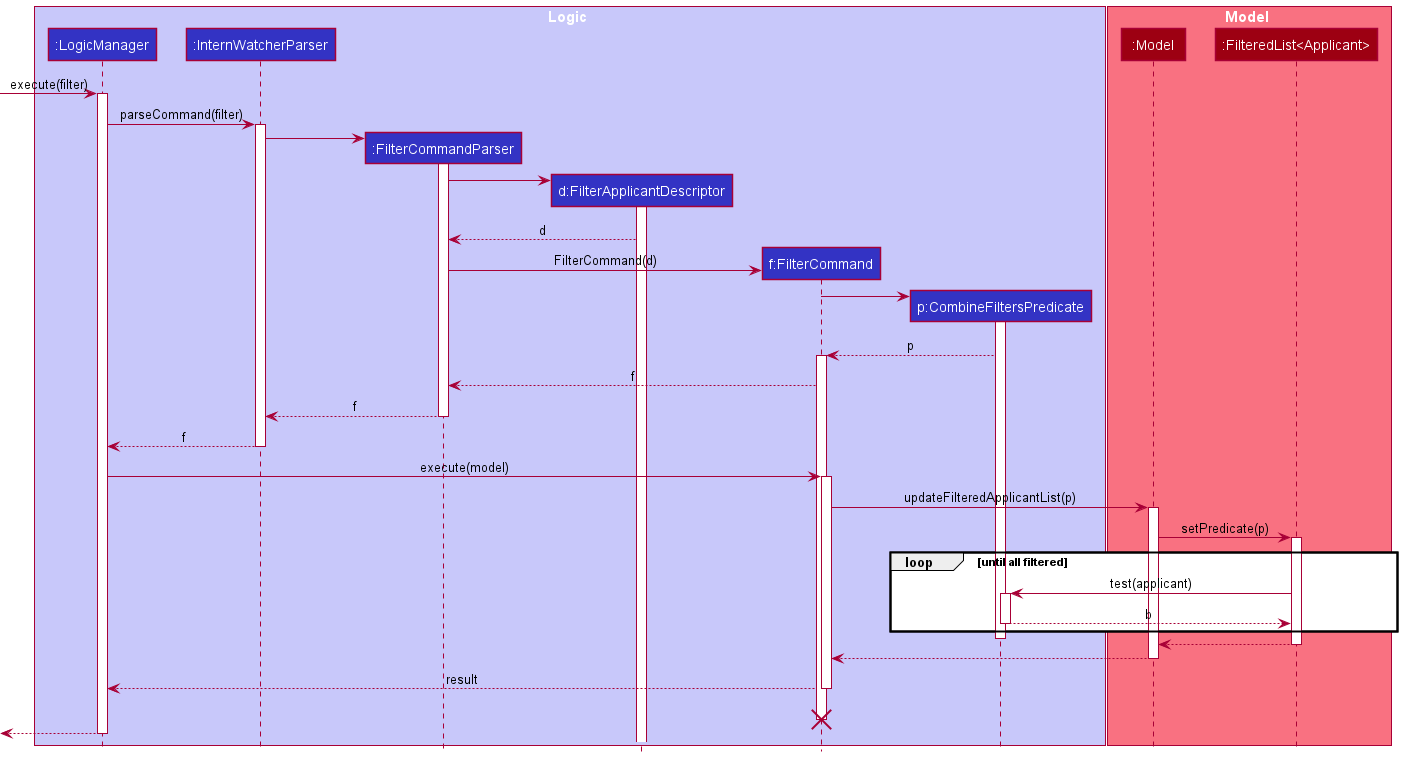
Design considerations:
Aspect: How filter for different fields work
-
Name, Phone, Email: These fields are excluded from filter criteria as
filteris supposed to serve the purpose of selecting potential candidates based on practical considerations other than these three fields. -
Grade: HRs should be more interested in finding candidates whose grades meet a certain threshold. Therefore, only applicants that have grades not smaller than the input
Gradewill be displayed. -
GraduationYearMonth: HRs should be more interested in finding candidates who graduate before a certain period and who are readily available for deployment before internship starts. Therefore, only applicants that graduate strictly earlier than the input
GraduationYearMonthwill be displayed. - Institutions: HRs should be more open to accept applicants from a collection of institutions. For example, HRs may be interested in finding applicants that are from either NUS or NTU as the company has affiliation programme with the said two institutions. Also, such filters should be case-insensitive as the capitalisation is not meaningful when considering the said fields.
- Jobs: HRs should be more interested in filtering applicants for a range of related jobs. For example, HRs may be interested in choosing appropriate applicants for both software engineer and software tester as the requirements for both jobs are similar, and it is easier to look at both at once. Also, such filters should be case-insensitive as the capitalisation is not meaningful when considering the said fields.
-
Skills: HRs should be more interested to use multiple
Skillfilters to exclusively find applicants that have all skills required in order to perform the applied job. And the filters shall be case-sensitive as capitalisation may differentiate two seemingly same skills. -
Statues: HRs should be more interested to only look at certain groups of applicants filtered by a selection of
Statusfilters. For example, a HR wishes to delete all applicants to a job except for those “accepted” after the job is filled up. This filter shall be case-sensitive as it is a special tag that has pre-defined elements. - Courses: HRs should be more interested to find applicants from a collection of courses as one same job can be assigned to applicants from similar but different courses. Also, the filter shall be case-insensitive.
Undo/redo feature
Implementation
The undo/redo mechanism is facilitated by VersionedInternWatcher. It extends InternWatcher with an undo/redo history, stored internally as an watcherStateList and currStatePointer. Additionally, it implements the following operations:
-
VersionedInternWatcher#commitState()— Saves the current Intern Watcher state in its history. -
VersionedInternWatcher#undo()— Restores the previous Intern Watcher state from its history. -
VersionedInternWatcher#redo()— Restores a previously undone Intern Watcher state from its history.
These operations are exposed in the Model interface as Model#commitInternWatcher(), Model#undoInternWatcher() and Model#redoInternWatcher() respectively.
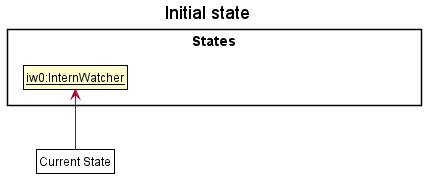
Given below is an example usage scenario and how the undo/redo mechanism behaves at each step.
Step 1. The user launches the application for the first time. The VersionedInternWatcher will be initialized with the initial Intern Watcher state, and the currStatePointer pointing to that single Intern Watcher state.
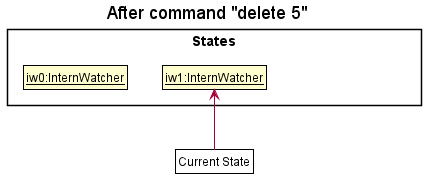
Step 2. The user executes delete 5 command to delete the 5th applicant in the applicant list . The delete command calls Model#commitInternWatcher(), causing the modified state of the applicant list after the delete 5 command executes to be saved in the watcherStateList, and the currStatePointer is shifted to the newly inserted Intern Watcher state.
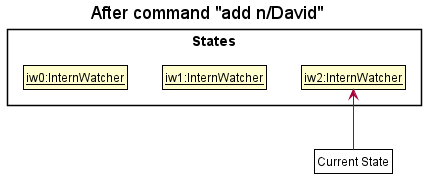
Step 3. The user executes add n/David … to add a new applicant. The add command also calls Model#commitInternWatcher(), causing another modified Intern Watcher state to be saved into the watcherStateList.
Model#commitInternWatcher(), so the Intern Watcher state will not be saved into the watcherStateList.
Step 4. The user now decides that adding the applicant was a mistake, and decides to undo that action by executing the undo command. The undo command will call Model#undoInternWatcher(), which will shift the currStatePointer once to the left, pointing it to the previous state, and restores the applicant list to that state.
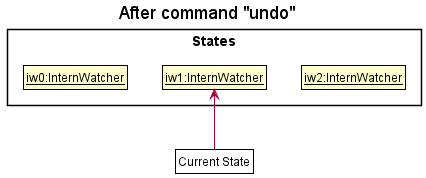
currStatePointer is at index 0, pointing to the initial Intern Watcher state, then there are no previous Intern Watcher states to restore. The undo command uses Model#canUndoInternWatcher() to check if this is the case. If so, it will return an error to the user rather
than attempting to perform the undo.
The following sequence diagram shows how the undo operation works:
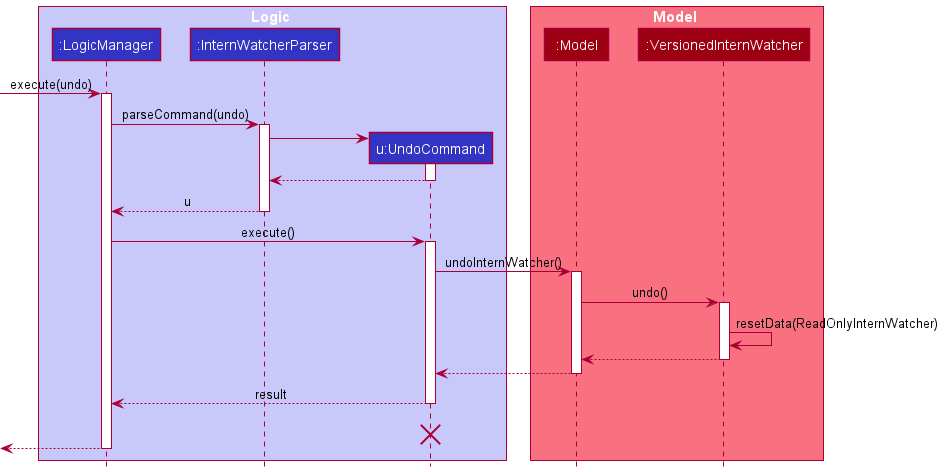
UndoCommand should end at the destroy marker (X) but due to a limitation of PlantUML, the lifeline reaches the end of diagram.
The redo command does the opposite — it calls Model#redoInternWatcher(), which shifts the currStatePointer once to the right, pointing to the previously undone state, and restores the applicant list to that state.
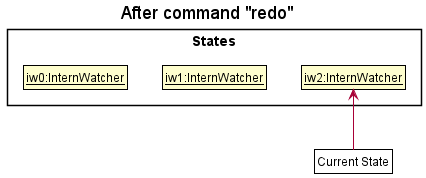
currStatePointer is at index watcherStateList.size() - 1, pointing to the latest Intern Watcher state, then there are no undone Intern Watcher states to restore. The redo command uses Model#canRedoInternWatcher() to check if this is the case. If so, it will return an error to the user rather than attempting to perform the redo.
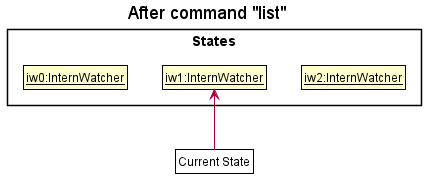
Step 5. Let’s say that the user goes through with the Undo command and the currStatePointer points to the previous state. The user then decides to execute the command list. Commands that do not modify the applicant list, such as list, will usually not call Model#commitInternWatcher(), Model#undoInternWatcher() or Model#redoInternWatcher(). Thus, the watcherStateList remains unchanged.
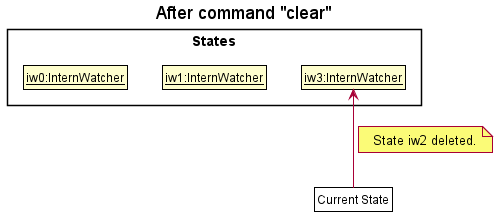
Step 6. The user executes clear, which calls Model#commitInternWatcher(). Since the currStatePointer is not pointing at the end of the watcherStateList, all Intern Watcher states after the currStatePointer will be purged. Reason: It no longer makes sense to redo the add n/David … command. This is the behaviour that most modern desktop applications follow.
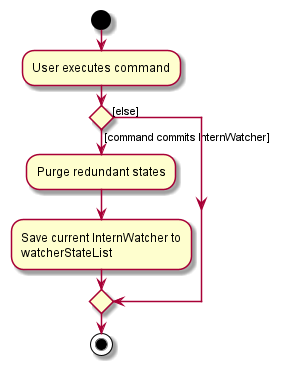
The following activity diagram summarizes what happens when a user executes a new command:
Design considerations:
Aspect: How undo & redo executes:
-
Alternative 1 (current choice): Saves the entire applicant list.
- Pros: Easy to implement.
- Cons: May have performance issues in terms of memory usage.
-
Alternative 2: Individual command knows how to undo/redo by
itself.
- Pros: Will use less memory (e.g. for
delete, just save the applicant being deleted). - Cons: We must ensure that the implementation of each individual command are correct.
- Pros: Will use less memory (e.g. for
Aspect: How to store saved states:
-
Alternative 1: Use two stack data structures, one for Command history and one for Undo history.
- Pros: Using a stack is intuitive for undo/redo as the current state is simply the top of the Command History stack. When undo is executed, the top of the stack can be popped and added into the Undo History stack.
- Cons: We must implement and manage two stacks for the functionality.
-
Alternative 2 (current choice): Use array list data structure with a pointer.
- Pros: Easy to implement. Only requires one data structure for both undo and redo.
- Cons: The array list must be constantly updated and purged when a new undoable command is executed.
Documentation, logging, testing, configuration, dev-ops
Appendix: Requirements
Product scope
Target user profile:
- has a need to manage a significant number of internship applications from campus recruitment
- prefer desktop apps over other types
- can type fast
- prefers typing to mouse interactions
- is reasonably comfortable using CLI apps
Value proposition: Manage applications faster and more efficiently with the functions the app provides
User stories
Priorities: High (must have) - * * *, Medium (nice to have) - * *, Low (unlikely to have) - *
| Priority | As a … | I want to … | So that I can… |
|---|---|---|---|
* * |
new user | see usage instructions | refer to instructions when I forget how to use the App |
* * * |
user | add a new applicant | |
* * * |
user | delete an applicant | remove entries that I no longer need |
* * |
user | delete all shown applicants | delete all entries that I no longer need |
* * * |
user | update applicant details | change entries accordingly |
* * |
user | update all filtered applicants’ details | change all entries accordingly |
* * * |
user | view an organised list of applicants | see suitable applicants at a glance |
* * |
user | undo or redo my last action | rectify a mistake I made |
* * * |
user | save applicant profiles to a file | refer to them later |
* * * |
user | read applicant profiles from a file | refer to them |
* * * |
user | mass filter applicants against certain criteria | find suitable applicants fitted for the job |
* * |
user | find applicants by their names | review and edit them accordingly |
Use cases
(For all use cases below, the System is the InternWatcher and the Actor is the user, unless specified otherwise)
Use case: Add an applicant application
MSS
- User requests to list applicants
- InternWatcher shows a list of applicants
- User requests to add a specific applicant in the list
-
InternWatcher adds the applicant
Use case ends.
Extensions
-
3a. The given details are invalid.
-
3a1. InternWatcher shows an error message.
Use case resumes at step 2.
-
Use case: Delete an applicant application
MSS
- User requests to list applicants
- InternWatcher shows a list of applicants
- User requests to delete a specific applicant in the list
-
InternWatcher deletes the applicant
Use case ends.
Extensions
-
2a. The list is empty.
Use case ends.
-
3a. The given index is invalid.
-
3a1. InternWatcher shows an error message.
Use case resumes at step 2.
-
Use case: Update an applicant application
MSS
- User requests to list applicants
- InternWatcher shows a list of applicants
- User requests to update a specific applicant in the list
-
InternWatcher updates the applicant
Use case ends.
Extensions
-
3a. The given index is invalid.
-
3a1. InternWatcher shows an error message.
Use case resumes at step 2.
-
-
3b. The given details are invalid.
-
3b1. InternWatcher shows an error message.
Use case resumes at step 2.
-
Use case: Update all applicants application
MSS
- User filters applicants to update
- InternWatcher shows a list of applicants
- User requests to update all applicants in the list
-
InternWatcher updates all displayed applicants
Use case ends.
Extensions
- 3a. The given details are invalid.
-
3b1. InternWatcher shows an error message.
Use case resumes at step 2.
-
Use case: Undo the last command
MSS
- User requests to undo their last command to the applicant.
-
InternWatcher reverts to the previous state before the last command.
Use case ends.
Extensions
- 1a. There are no previous states to revert to.
-
1a1. InternWatcher shows an error message.
Use case resumes at step 1.
-
Use case: Filter all applicant applications
MSS
- User requests to list applicants
- InternWatcher shows a list of applicants
- User requests to filter the list based on specifications entered
-
InternWatcher shows a list of applicants that fit the specifications
Use case ends.
Extensions
-
3a. Any given filters are invalid.
-
3a1. InternWatcher shows an error message.
Use case resumes at step 2.
-
Non-Functional Requirements
- Should work on any mainstream OS as long as it has Java
11or above installed. - Should be able to hold up to 1000 applicants without a noticeable sluggishness in performance for typical usage.
- A user with above average typing speed for regular English text (i.e. not code, not system admin commands) should be able to accomplish most of the tasks faster using commands than using the mouse.
- Project should deliver new updates every two weeks
- Data should be saved upon exit into a JSON format file
- Data should be read from a JSON at a fixed file location
- The final product should not have to use a mouse
- The final product should be contained in a single window
- The system should provide sufficient hints to be usable by a novice.
Glossary
- Mainstream OS: Windows, Linux, Unix, OS-X
Appendix: Instructions for manual testing
Given below are instructions to test the app manually.
Launch and shutdown
-
Initial launch
-
Download the jar file and copy into an empty folder
-
Double-click the jar file Expected: Shows the GUI with a set of sample contacts. The window size may not be optimum.
-
-
Saving window preferences
-
Resize the window to an optimum size. Move the window to a different location. Close the window.
-
Re-launch the app by double-clicking the jar file.
Expected: The most recent window size and location is retained.
-
Editing an applicant
-
Editing an applicant while all applicants are shown
-
Prerequisites: List all applicants using the
listcommand. Multiple applicants in the list. -
Test case:
edit 1 a/ INTERVIEWED
Expected: First applicant of the list modified to have theINTERVIEWEDapplication status. Details of the edited applicant shown in the status message. Timestamp in the status bar is updated. -
Test case:
edit 0 a/ INTERVIEWED
Expected: No applicant is edited. Error details shown in the status message. Status bar remains the same. -
Other incorrect edit commands to try:
edit,edit x,...(where x is larger than the list size)
Expected: Similar to previous. -
Test case:
edit ALL a/ INTERVIEWED
Expected: All currently displayed applicants modified with theINTERVIEWEDapplication status. Number of applicants successfully edited shown in the status message. Timestamp in the status bar is updated. -
Test case:
edit ALL p/ 123
Expected: No applicant is edited. Error details shown in the status message. Status bar remains the same.
-
Deleting an applicant
-
Deleting an applicant while all applicants are being shown
-
Prerequisites: List all applicants using the
listcommand. Multiple applicants in the list. -
Test case:
delete 1
Expected: First applicant is deleted from the list. Details of the deleted applicant shown in the status message. Timestamp in the status bar is updated. -
Test case:
delete 0
Expected: No applicant is deleted. Error details shown in the status message. Status bar remains the same. -
Other incorrect delete commands to try:
delete,delete x,...(where x is larger than the list size)
Expected: Similar to previous. -
Test case:
delete ALL
Expected: All currently displayed applicants are deleted. Number of applicants successfully deleted shown in the status message. Timestamp in the status bar is updated.
-
Viewing an applicant’s details
- Viewing an applicant’s details while all applicants are being shown
- Prerequisites: List all applicants using the
listcommand. Multiple applicants in the list. - Test case:
view 1
Expected: First applicant’s details are displayed. Details of the applicant is shown in the status message. Timestamp in the status bar is updated. - Test case:
view 0
Expected: No applicant detail displayed. Error details shown in the status message. Status bar remains the same. - Other incorrect view commands to try:
view,view x....(where x is larger than the list or a non-positive number)
Expected: Similar to previous.
- Prerequisites: List all applicants using the
Saving data
-
Dealing with missing/corrupted data files
- Save file is missing: A new save file
internwatcher.jsonwill be created onexitthe next time Intern Watcher is used. - Save file is corrupted: If invalid data is present, such as a person with phone number
abcd, Intern Watcher will start with an empty applicant list instead. - Save file applicant has duplicate fields: If an applicant has duplicate fields, such as two
phonekey value pairs, Intern Watcher will parse the applicant with the lastphonevalue.
- Save file is missing: A new save file